

Soar Over Eagle Ridge
Our course tour includes the original course renderings by legendary architects Ron Fream and David Dale, complete with yardages and strategies to make your round memorable.
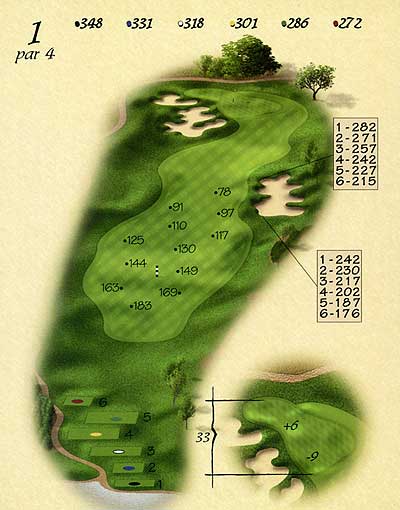
Hole #1
This 348 yard par four starting hole gives the player a generous landing area we all love on the first hole. A short iron played into the well bunkered must be accurate or your first taste of Eagle Ridge could be attempting a sand save. Play the second to the right half of the green and let your putter do the rest.

Hole #2
At 162 yards this downhill par three is not the longest Eagle Ridge offers. Don’t let views distract you from your task at hand, hitting the green. Missing this green short is a sure way to make bogey. The deep bunker guarding the front of this green is a challenge for even the most skilled player. It makes no putt a guarantee.
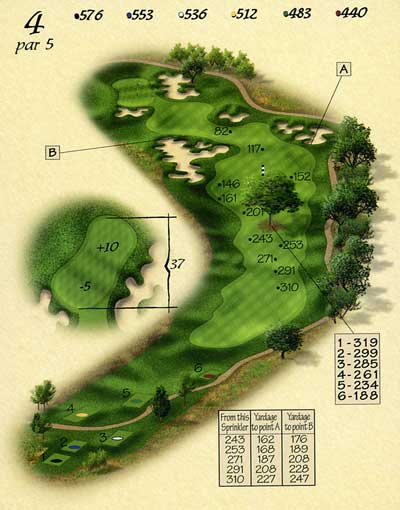
Hole #4
#4 the first par five at 574 yards is lined by an oak forest to the right and guarded by a lone oak midway down the left side of the fairway. Hit to the right to avoid this sentinel, then take aim at the bunkers straight ahead to set up an approach shot to a large green with bunkers on three sides.


Hole #6
This 156-yard par three features a sod face bunker guarding the right front of the green. A ball hit from this bunker often must be played sideways or backwards just to get out. There is more green to the left than it appears from the tee. Be safe and play an extra club up the hill to the green.

Hole #8
This great par four is 407 yards. The scenery is spectacular from this narrow, hillside fairway. Aim your tee shot to the bunker complex on the left to save your chances of conquering this very narrow green. Bunkered on the left and sloping sharply to the creek below on the right, this green demands an accurate second shot and careful putting.
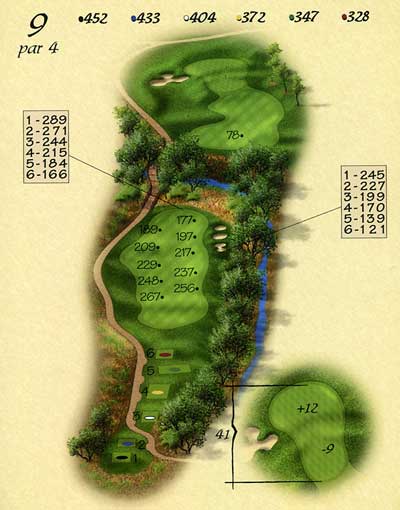
Hole #9
Often thought of as a signature hole for Eagle Ridge, this 452-yar par four is all you could ever want in a golf hole. It is narrow off the tee with a hill to the left and the creek running down the right. From the fairway you see the 50-yard wide ravine ahead then a wider fairway awaiting your lay-up shot. Only the bunker in the left center of the fairway guards the green from 50 yards out. Par here always wins.
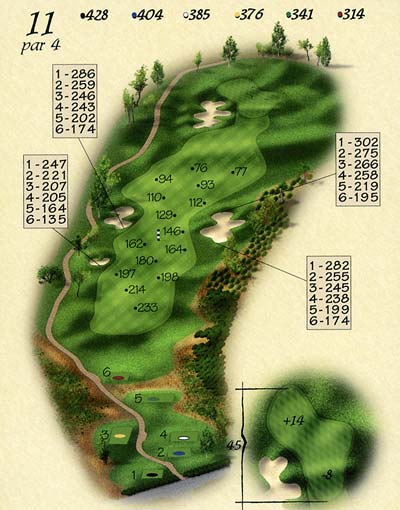
Hole #11
Slightly downhill at 436 yards, this hole offers a confidence-building view to generous landing areas and a wide-open feel. The putting surface is large with gentle undulations and well-placed greenside bunkering. Take the time to relax and gear up for the challenge that waits around the bend.
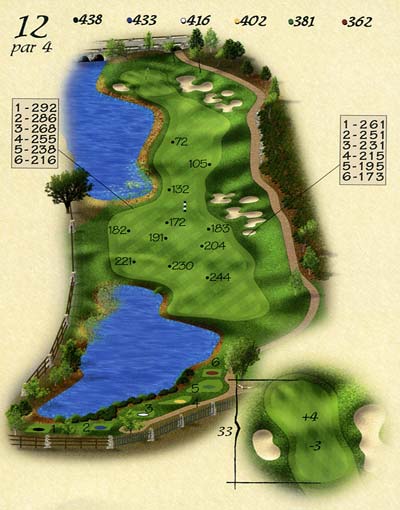
Hole #12
A 438-yard par four. Here is water trouble long and our signature bunkers right. Tee shots must be planned and executed, not just blasted down the fairway. This second shot only invites more trouble. Bunkers right and a green sloping toward water to the left make the approach very challenging. Many players choose this as the best par four at Eagle Ridge.

Hole #13
A par three at 228 yards from the tips. No bunkers in front give everyone a chance to run a shot up on this green. But a sloping front can often send that same shot back down the hill. Pitching to this green is a real challenge. It has many undulations, and proper shot placement is paramount to scoring here.
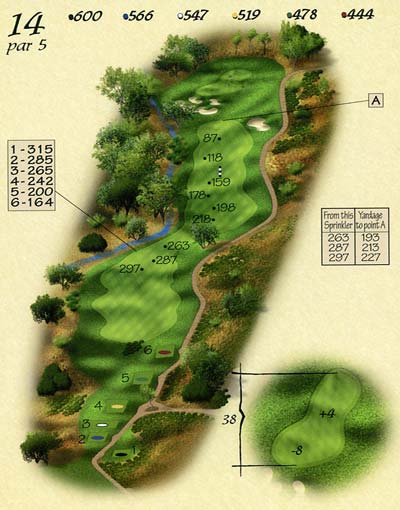
Hole #14
#14 is 600 yards form the back tee. This hole offers a generous landing area off the tee but requires a planned second shot to lay up about 120 yards short of the green. This will leave you a reasonable chance to avoid the bunker short and right of the putting surface. Enjoy the beauty of this hole. Take par and run.
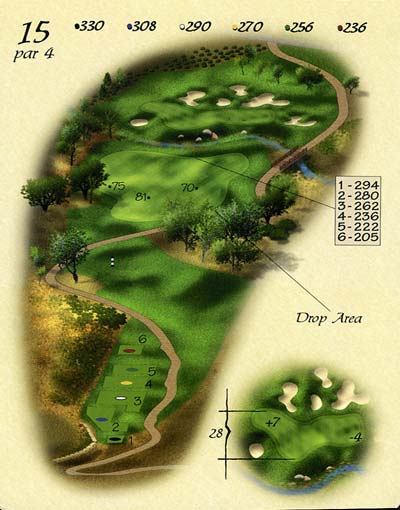
Hole #15
#15 is the shortest par four on the course at 330 yards. The creek running in front of the green is reachable for the long hitter – about 260 yards downhill off the tee. Playing a fairway wood or long iron is preferable to set-up a short approach to the green. The green narrows from front to back, so choose the proper distance for your second shot. There are three distinct landing areas, and an errant shot can reach the green without guaranteeing a reasonable putt for birdie.
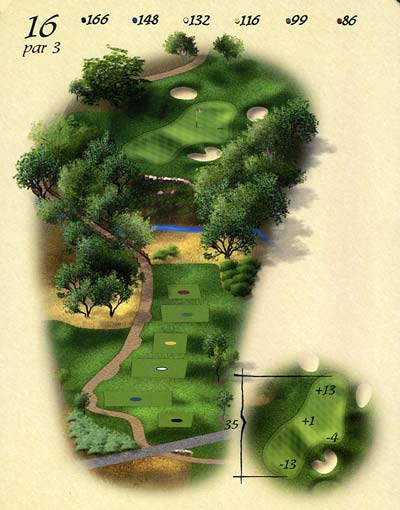
Hole #16
#16 is 166 yards. The green is guarded in front by a hillside and bunkers and framed in back by two beautiful oaks. This hole, like #6, is slightly uphill and can be deceiving. The back right of the kidney-shaped green leaves you only a very challenging shot. The smart play is safe to the left and take a two-putt par.
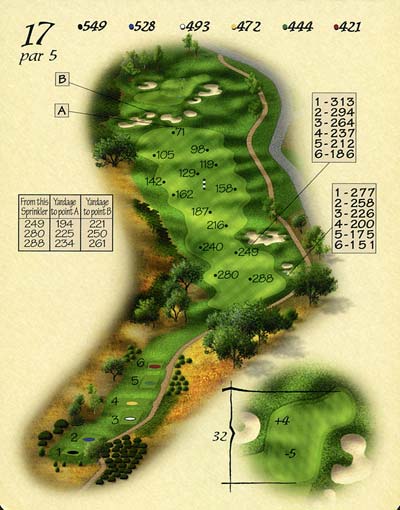
Hole #17
The last par five is 547 yards and wider than it looks. The tee shot is downhill to a generous landing area through some trees. A lay up on the second shot should be short of the bunkers 50 yards in front of the green. It will leave you the chance to hit and hold the back-to-front sloping green.
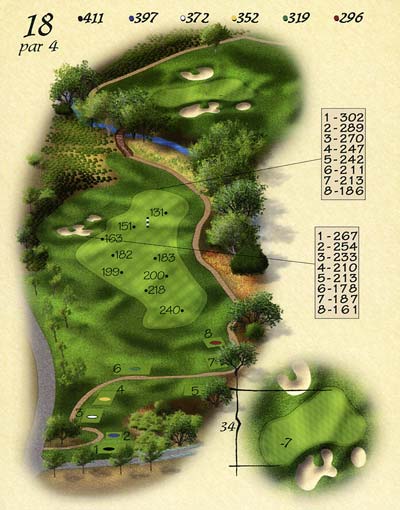
Hole #18
#18 is 411 yards. Like #9, it is touted as a signature hole for Eagle Ridge. The fairway is guarded on the left by three bunkers. Combined with the tree line down the right, this makes hitting this fairway imperative. Trees narrow in front of the green to create a funnel on your way to a well bunkered, undulating green. As if all that isn’t enough, the ravine meanders through the fairway about 100 yards from the green. The beauty and challenge of this hole with the spectacular clubhouse in the background create an unforgettable finish to your day.
Rating/Slope
| Tee | Yardage | Rating/Slope |
| Black | 6941 | 74.1/140 |
| Blue | 6618 | 72.6/136 |
| Men’s White | 6264 | 71.1/130 |
| Women’s White | 6264 | 76.7/142 |
| Men’s Yellow | 5912 | 69.7/127 |
| Women’s Yellow | 5912 | 74.8/140 |
| Men’s Yellow/Burgundy Combo | 5407 | 68.0/122 |
| Women’s Yellow/Burgundy Combo | 5407 | 72.3/128 |
| Women’s Burgundy | 5157 | 71.0/123 |